The Guide to Fixing pH Drift
What causes pH drift and how to fix it
pH drift is one of the most frustrating issues to troubleshoot because it may seem random and be caused by many different aspects of the environment, maintenance, and sensor design.
Is it the solution, sensor, or electrode that is drifting? Is the electrode too old? Did something happen during shipment? Is there electrical interference with the sensor?
This guide will provide steps to simplify the troubleshooting process and determine what the cause of drift is along with how to fix it.
What is Actually Drifting?
First off, how do we determine what part of the system is drifting? The first step is knowing the physical properties of your solution. There are many forums online where people ask why their pH meter or sensor reading isn’t stable, only to find out that the solution they are measuring is the culprit. Unless you are measuring a buffer, there is always going to be some amount of instability seen due to reactions in the solution itself or between the solution and its’ environment. A good example of this is pure water, which has a low buffering capacity that results in drift as CO2 from the atmosphere enters and acidifies the water.
pH is also dependent on temperature. If the solution is rapidly changing temperature because it was just taken out of the fridge, then there is going to be some drift as hydrogen ions change activity level. Most sensors nowadays have Automatic Temperature Compensation (ATC). This technology removes the manual aspect calculating the effect on temperature, but what happens when the sensor and sample solution are not at room temperature? Drift happens as the solution and sensor equilibrates. The best way to prevent it is to leave the sensor in the solution until they reach the same temperature. For rapid, frequent temperature changes, a specialized electrode may be necessary.
As shown by these examples, what may seem to be equipment drift is actual pH drift that the sensor is measuring accurately. So how can we determine what the true source of drift is?
The following troubleshooting steps help with this process. You may also view our pH Drift Troubleshooting Flowchart which provides the same instructions and solutions in a simple, printable format.
Troubleshooting Steps
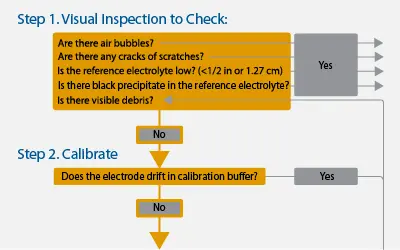
Step 1. Visual Inspection
Do not clean the electrode until after calibration unless there are obvious signs of debris build-up. Cleaning immediately can make the source of drift more difficult to determine.
While not every problem is visual, knowing what the sensor, electrode, and electrolyte solution are supposed to look like is important to identify immediate problems.
Is the junction supposed to be grey? (Depends on the manufacturer)
Should there be flecks of black particles in the reference electrolyte? (No)
Start by looking for any damage such as cracks or scratches on the bulb. Obviously, a crack affects proper measurements, but even small scratches create an uneven surface for measurement that can cause drifting and slow stabilization. There may also be microscopic scratches caused by large particulates hitting the bulb and we will go into identifying those later.
While inspecting the bulb, look for any trapped air bubbles. These can be introduced by being shaken in shipping, storage, or strong currents. The bubbles affect the ability for the wires to create good connections and can result in drift.
Next, check if the electrolyte level is low (procedure varies by manufacturer. Electrodes in pHionics products must be removed to clearly see the level. Instructions are available here). If the electrolyte is lower than about ½” (1.27 cm), then the inner wires may be making poor contact, causing drift or extreme fluctuations. Check if the electrode is refillable or replaceable and act accordingly.
While looking at the electrolyte, check for any black precipitate floating or accumulating near the junctions. This is created when something in the sample solution reacts with silver present in the reference half-cell and leads to inaccurate measurements. The phenomenon is especially common with silver/silver chloride single junction electrodes but can occur in double junction electrodes if they are exposed to high levels of heavy metals, organics, or proteins that enter through the junction. The electrode may be regenerated by following the procedure in Step 4 – Cleaning, but the electrode likely requires replacement. A double junction or reference other than silver/silver chloride may be required for your application.
Look for any built-up debris or algae around the bulb or junction. If there is build-up, then cleaning should be done so that any scratches or bubbles in the bulb are not blocked from view. Any type of build-up can interfere with connection between the electrode half-cells and cause drifting. In wastewater applications especially, there is a large variety of debris that can latch onto sensors which can be difficult to combat. The sensor may be cleaned just yesterday but have new debris accumulate by the next day, or it might not happen for many days, making maintenance scheduling difficult. In other applications with cleaner water, build-up large enough to cause drift may only happen every few months so a more consistent maintenance schedule can be created.
If there are no clear signs of damage or electrolyte issues, then move onto Step 2.
Step 2. Calibration
Let’s go over the best practices for calibration.
- Use two freshly prepared, well-mixed, non-expired buffers that are at room temperature.
- 10 pH buffers are inherently less stable than the other calibration solutions so drift is more common.
- Make sure the sensor is at room temperature.
- Do not calibrate near any heavy machinery or high voltage lines that give off electromagnetic interference (EMI). This can be difficult to do depending on how the sensor is wired.
- Rinse the sensor with RO/DI water before calibration and between each buffer.
- Immerse the sensor in each buffer and let the sensor stabilize (less than 0.01 mA or pH change per minute. Generally requires 2-10 mins)
- If the sensor does not stabilize, move to Step 4.
- For the pHionics STs Series pH, ensure the metal housing is contacting the buffer.
- If drifting was noticed over a period of hours or days then keep the sensor in 7 pH buffer for an hour or more to check if the measurement trends up or down.
- Record the sensor output for each buffer to be used in the next step.
By following these procedures, the most accurate calibration is ensured, making troubleshooting easier.
Step 3. Calculate Slope and Offset
Use the following information to determine if the electrode is in acceptable range (These are pHionics guidelines based on calibration at 25°C and may not be the same for other manufacturers):


The source is likely electromagnetic interference with the sensor/electronics if:
- Slope and offset are within range AND measurements do not drift during calibration but drift during use. The drift during use may have a pattern, disappearing periodically or changing magnitude rapidly.
- This is why we wait to clean the electrode. If it was cleaned before being calibrated and found to be within range for slope and offset and not drifting during calibration, then it would be more difficult to determine if the cause was an issue with the electrode or EMI.
- Please read our article on eliminating electromagnetic interference for more information on causes and solutions.
The source is likely the electrode if:
- The slope and/or offset are out of range.
- These metrics determine the remaining lifespan/cleanliness of the electrode.
- Measurements drift during calibration after following all the steps above.
- Drift is noticed over long periods of time (weeks-months) during use.
- Please continue to Step 4.
Step 4. Cleaning
Follow the recommended procedures based on the type of debris present in the process solution.

Step 5. Calibrate and Calculate Slope and Offset
Cleaning should remove any build-up on the surface of the junction or bulb, although any debris lodged inside the junction may not be removed. If the slope and/or offset were not within range before but are now, then you know that the problem was due to build-up. More frequent cleaning may be required in the future to control drift.
You may repeat the cleaning steps multiple times or for longer periods of time if the slope and offset are not within range. Doing so may remove debris lodged in the junction and is recommended before replacing the electrode, especially if the electrode has been in use for less than 6 months. The other causes and solutions can be found below.
If the slope and offset are still out of range, then the issue is likely caused by the reference electrolyte or damaged bulb.
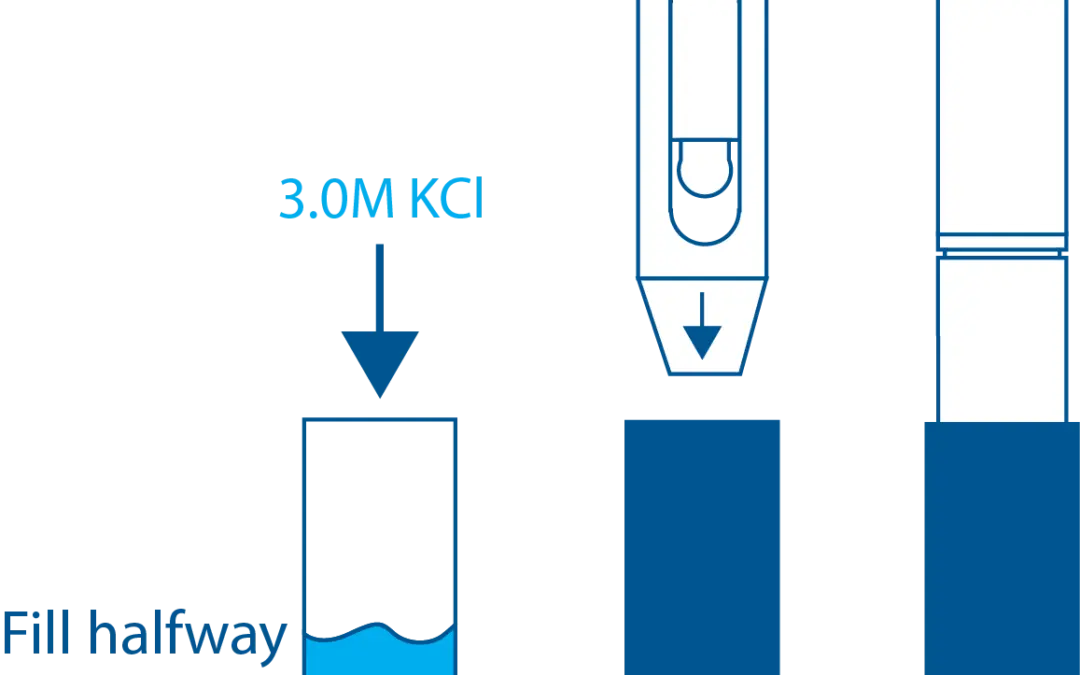
The reference electrolyte gets contaminated and diluted by process water, causing significantly shifts in accuracy and stability over time. This generally takes months of use (at least 6 months for most manufacturers; 3-year average for pHionics) and occurs more rapidly in pure and ultrapure applications. If drift occurred only after the sensor was in use for a long period of time, then electrolyte dilution is likely the cause. Storage in RO/DI water also drastically reduces the lifespan of the electrode and causes drift.
The solution is to fill the electrode with new reference electrolyte if it is refillable or replace the electrode.
The pH-sensitive gel on the bulb may have been scratched by particulates or worn away due to acidic conditions. These problems have the same symptoms as reference electrolyte dilution, so they are difficult to differentiate. It may be possible to regenerate the bulb using hydrofluoric acid but results are not guaranteed and many people do not like the hazards of working with such a strong acid.
If regeneration does not work or is not attempted, then the only solution is to replace the electrode.
Summary of Causes of pH Drift Including Identification and Solutions
Air Bubbles
- Identification: Visual inspection of the bulb should show an air bubble if one is present. The air causes poor circuit formation, resulting in inconsistent measurements that may appear to be drifting.
- Solution: Hold the sensor tightly by the end opposite the electrode and flick it down. This forces solution back into the bulb.
Damaged Electrode
- Identification: Visual inspection of the bulb may show scratches or cracks on the surface of the bulb. If the electrode is used to measure solution with larger particulates like sand, then those could hit the bulb and cause small scratches that build up over time. This wears down the gel layer, causing drift and slow response time.
- Solution: Unfortunately, the electrode must be replaced. If using a pHionics STs Series pH™, the replacement process is easy with our patented keyless system.
Reference Electrolyte
- Identification: The electrolyte eventually gets diluted or contaminated by any solution during use or if stored in normal water. It can also be depleted and show a low level. When this happens, the slope and offset become out of range. The electrode starts to drift and responds slower to changes in pH. It may still be usable for certain applications but should be replaced if high accuracy and response time are concerns.
- Solution: If the electrolyte solution is replaceable then fill with new solution, otherwise the electrode must be replaced. Always store electrodes in a high ionic storage solution such as 3.0M KCl and use a double-junction electrode for better longevity. Storage solution may vary by manufacturer.
Silver Precipitate
- Identification: Black precipitate will appear in the reference solution or on the junctions. Possible if high levels of heavy metals, organics, proteins, or other compounds that react with silver are present.
- Solution: If the electrode is refillable then add new reference electrolyte, then check the slope and offset again. Otherwise, the electrode requires replacement. Always use a double junction electrode for solutions containing elements that react with silver. A Calomel or ROSS electrode is best to use for those applications.
Blocked Junction
- Identification: A clear junction is necessary for accurate measurements. When high concentrations of debris like fats and oils are present, they clog the junction, resulting in drift to complete loss of signal. Some debris may or may not be visible on the junction.
- Solutions:
- Cleaning should be done regularly to ensure proper flow. If not done regularly, the debris may lodge in the junction permanently and require electrode replacement. The best cleaning solutions depend on types of debris and a list of different cleaning solutions are available below in Additional Information for Step 4.
- pHionics electrodes are designed to be durable and easily cleaned. If using one, simply remove the guard and use a toothbrush to clean the junction. Avoid touching the glass bulb with the toothbrush.
- If blocked junctions are a consistent problem, choose an electrode with a high flow-through junction to prevent clogging. These electrodes generally are refillable and electrolyte solution can be purchased or made.
Non-Electrode Causes of Drift
pH of Solution Is Drifting
- Identification: If the slope and offset of the electrode are within range and the electrode is steady in calibration buffers, then the cause is not the electrode. Check if there are changing temperatures or if the solution is low conductivity (<100 µS/cm).
- Solutions: Allow temperatures to stabilize and research potential chemical reactions. If frequent, rapid temperature changes or low conductivity ranges are common then a special pH electrode may be required
Electromagnetic Interference
- Identification: Drift caused by EMI can appear and disappear in minutes or last for days depending on the source. Sudden changes may be caused by a pump or signal turning on. Look for patterns and try calibrating the sensor away from sources of EMI to see if drift changes.
- Solutions:
- If cable is replaceable, exchange for one with better shielding and twisted-pair wiring.
- Most sensors output a voltage signal that is sensitive to inductive coupling from nearby cables. Switch to a 4-20 mA instrument like the pHionics STs Series pH™ for better noise resistance. Learn more about analog signals in our article on Analog Signals: Voltage vs. Current.
- To learn more about the causes and solutions to EMI, please read our article on Eliminating EMI in Analog Signals.
Conclusion
Hopefully, this guide is helpful in determining the root cause of pH drift for your application. If you have found additional techniques that work for you, please reach out and we will add to the guide to provide the best resource possible. Please don’t hesitate to reach out for any comments or questions.
If you are looking for reliable pH measurements and excellent long-term value, then we highly recommend the pHionics STs Series pH. It has shown excellent accuracy (95% accurate within 5s) and stability due to built-in signal conditioning and isolation, while high quality materials allow the sensor and transmitter to last 10+ years in a wide range of applications (excluding electrodes, which last an average of 3 years). When the longevity and time saved on troubleshooting and maintenance are added up, the STs Series pH proves to be the best long-term investment for your business.
Suggest an Article or Video Topic!
Recent Articles
How Glass pH Electrodes Work
In this video, learn about the electrochemistry that allows silver/silver chloride pH electrodes to measure the acidity of solutions. Modern electrode design is also reviewed to demonstrate what improvements have been made and what weaknesses are still present. Click...
STs Series Sensor Storage
STs Series sensors are constructed from high-quality, durable materials that can be stored for long periods of time. The only weak point is the electrode, which can be damaged or expire during storage in the wrong conditions. These conditions vary depending on the type of electrode, which is why we have different storage instructions for each sensor.
How a Glass pH Electrode Works
A comprehensive article covering how glass electrodes measure pH in a simple, understandable format. Specifically for silver/silver chloride electrodes.